current location : home

Textile abrasion resistance test standard and grade rating method

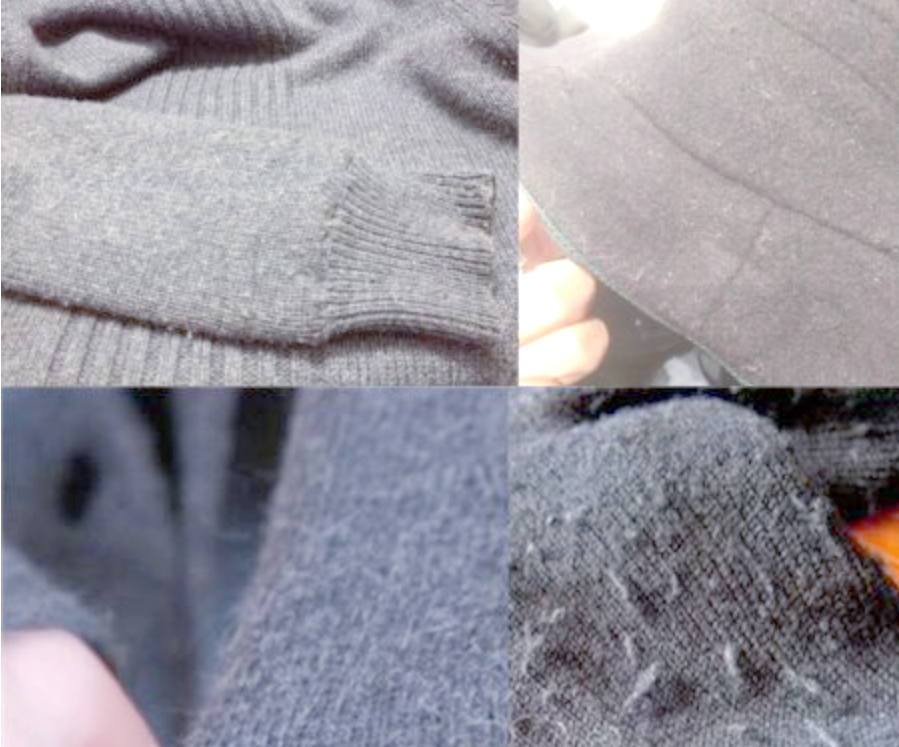
Abrasion resistance is an important indicator of textile product quality, which directly affects the durability and use of the product. Specifically refers to the fabric between or with other substances in the process of repeated friction, resistance to wear and tear characteristics.

Wear manifested in the form of fabric changes are mainly broken, loss of quality, appearance of discolouration, pilling and other changes. There are various methods for testing the abrasion resistance of textile products, such as the flat grinding method, the curved grinding method, the folded edge grinding method and the composite grinding method, etc. The Martindale method belongs to the flat grinding method. Martindale method is a kind of flat abrasion method, which is widely used in the abrasion resistance testing of clothing, home textiles, decorative fabrics and furniture fabrics.


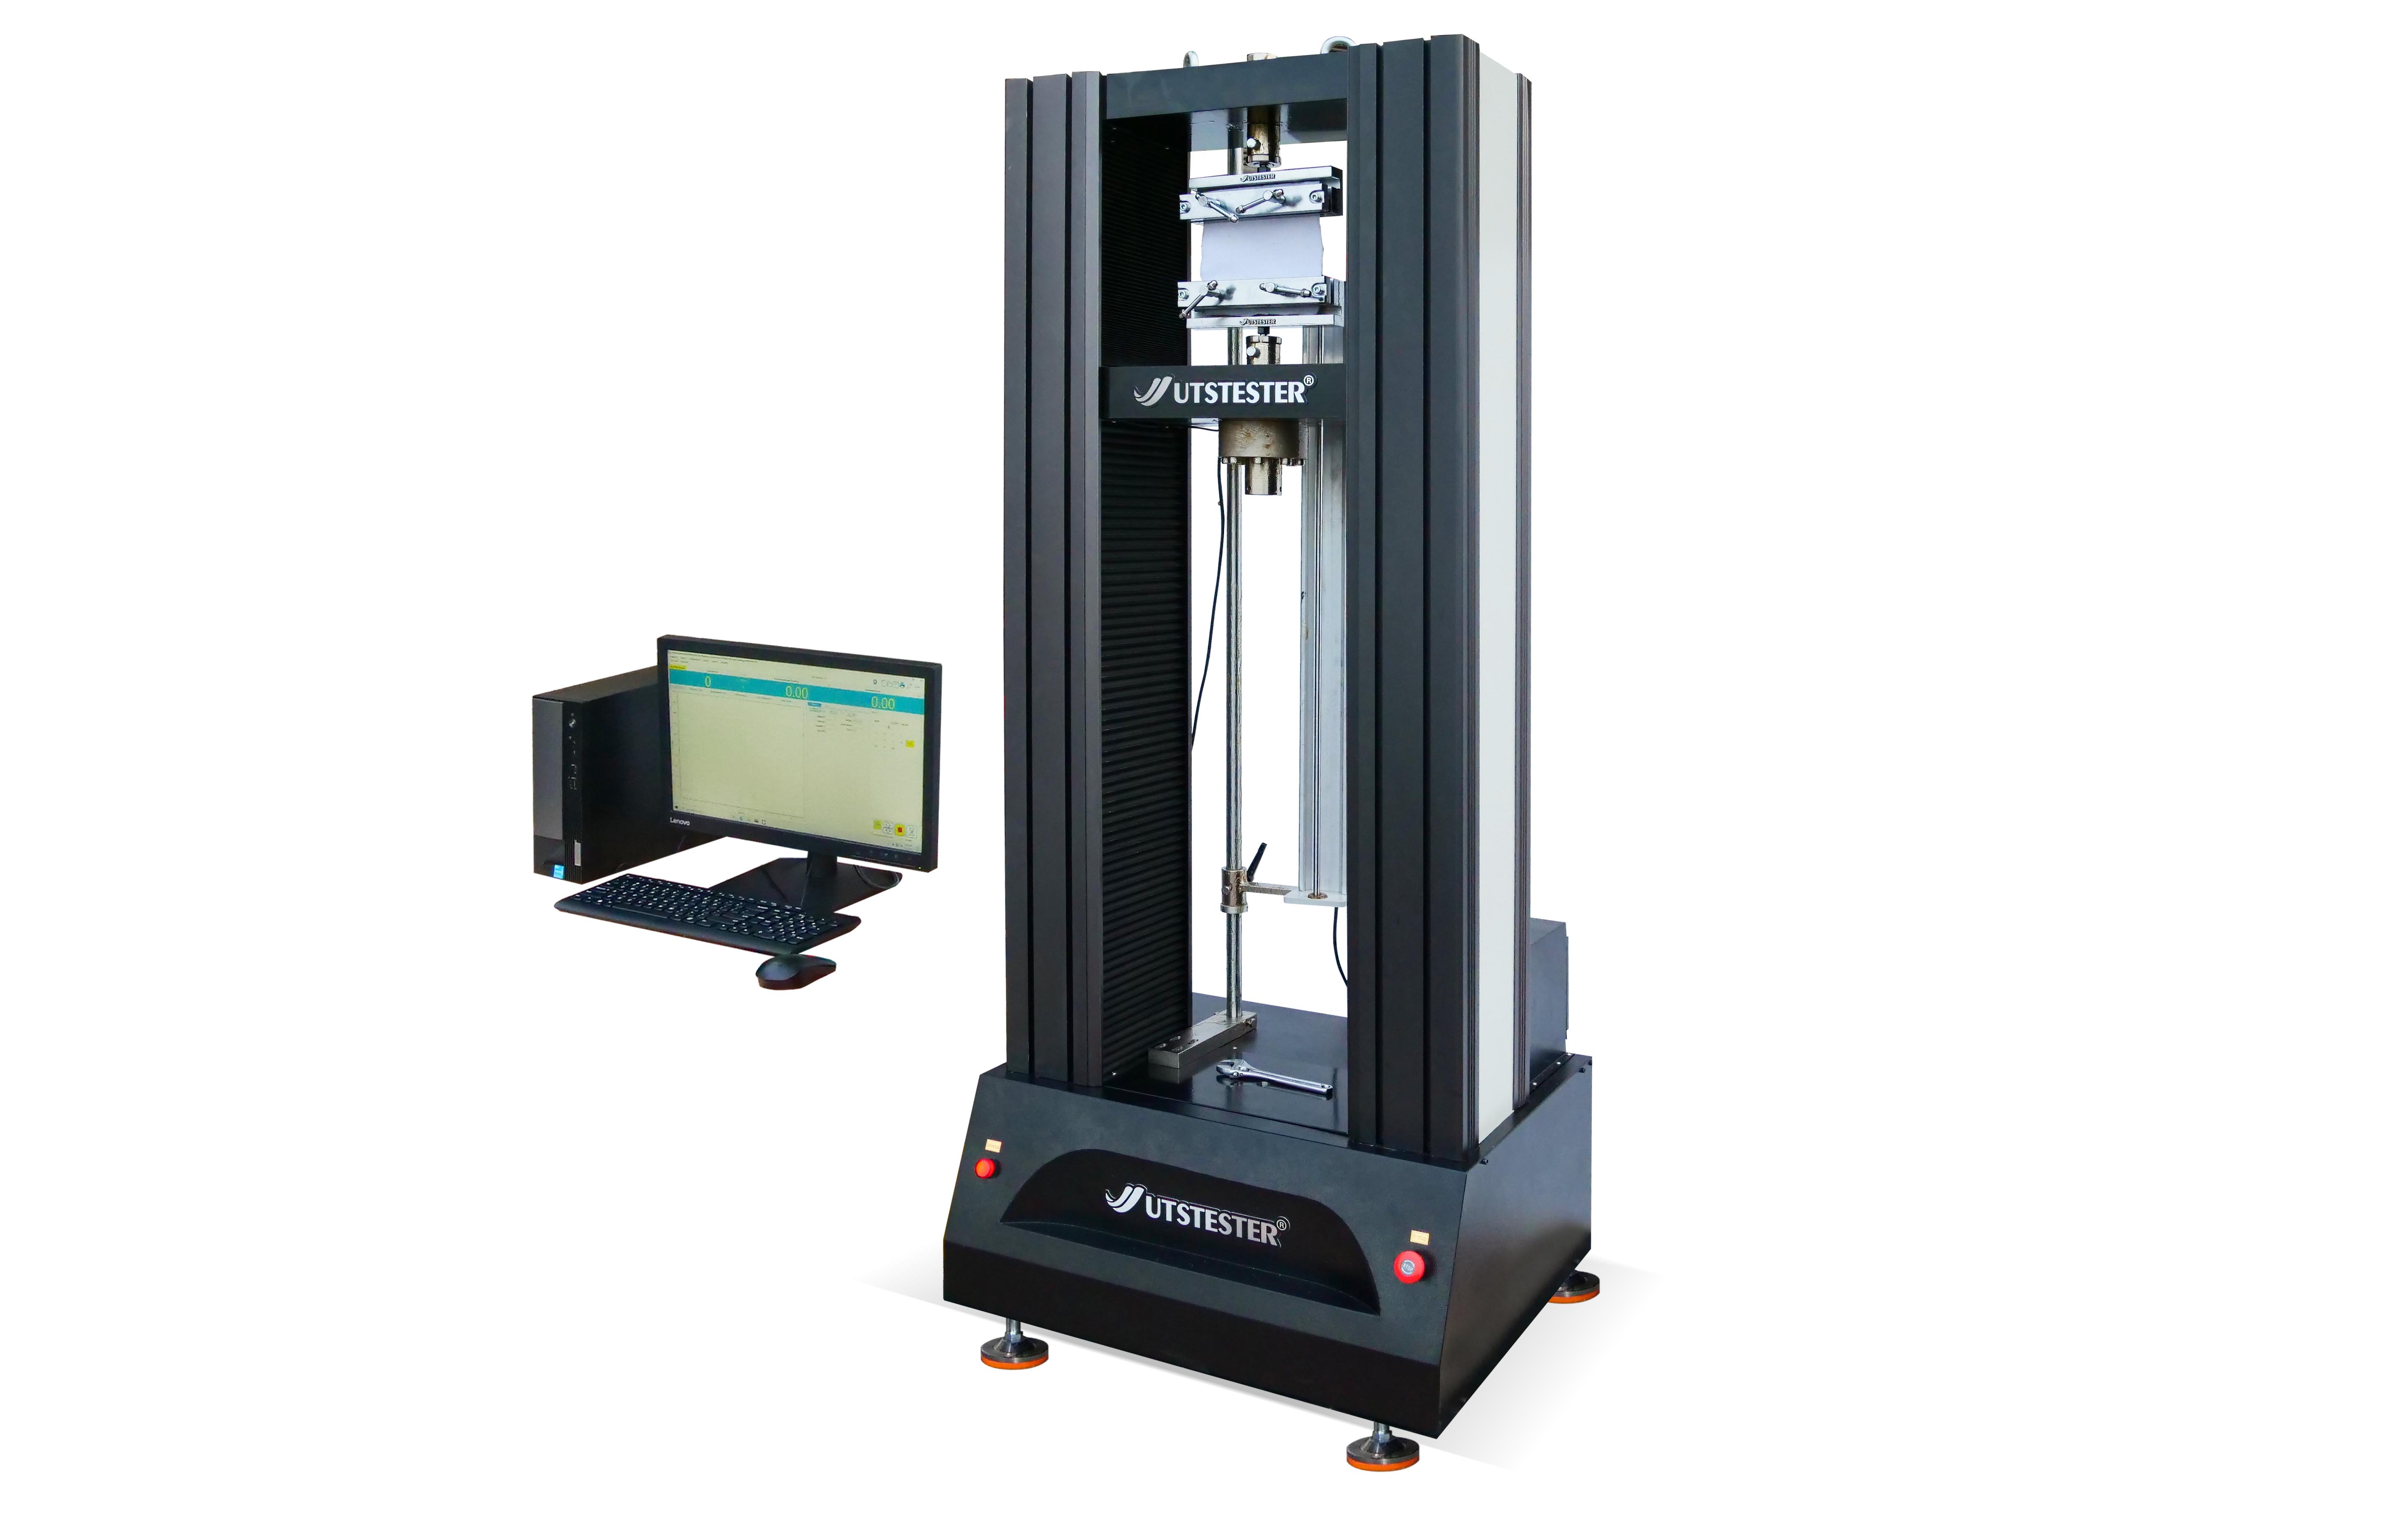
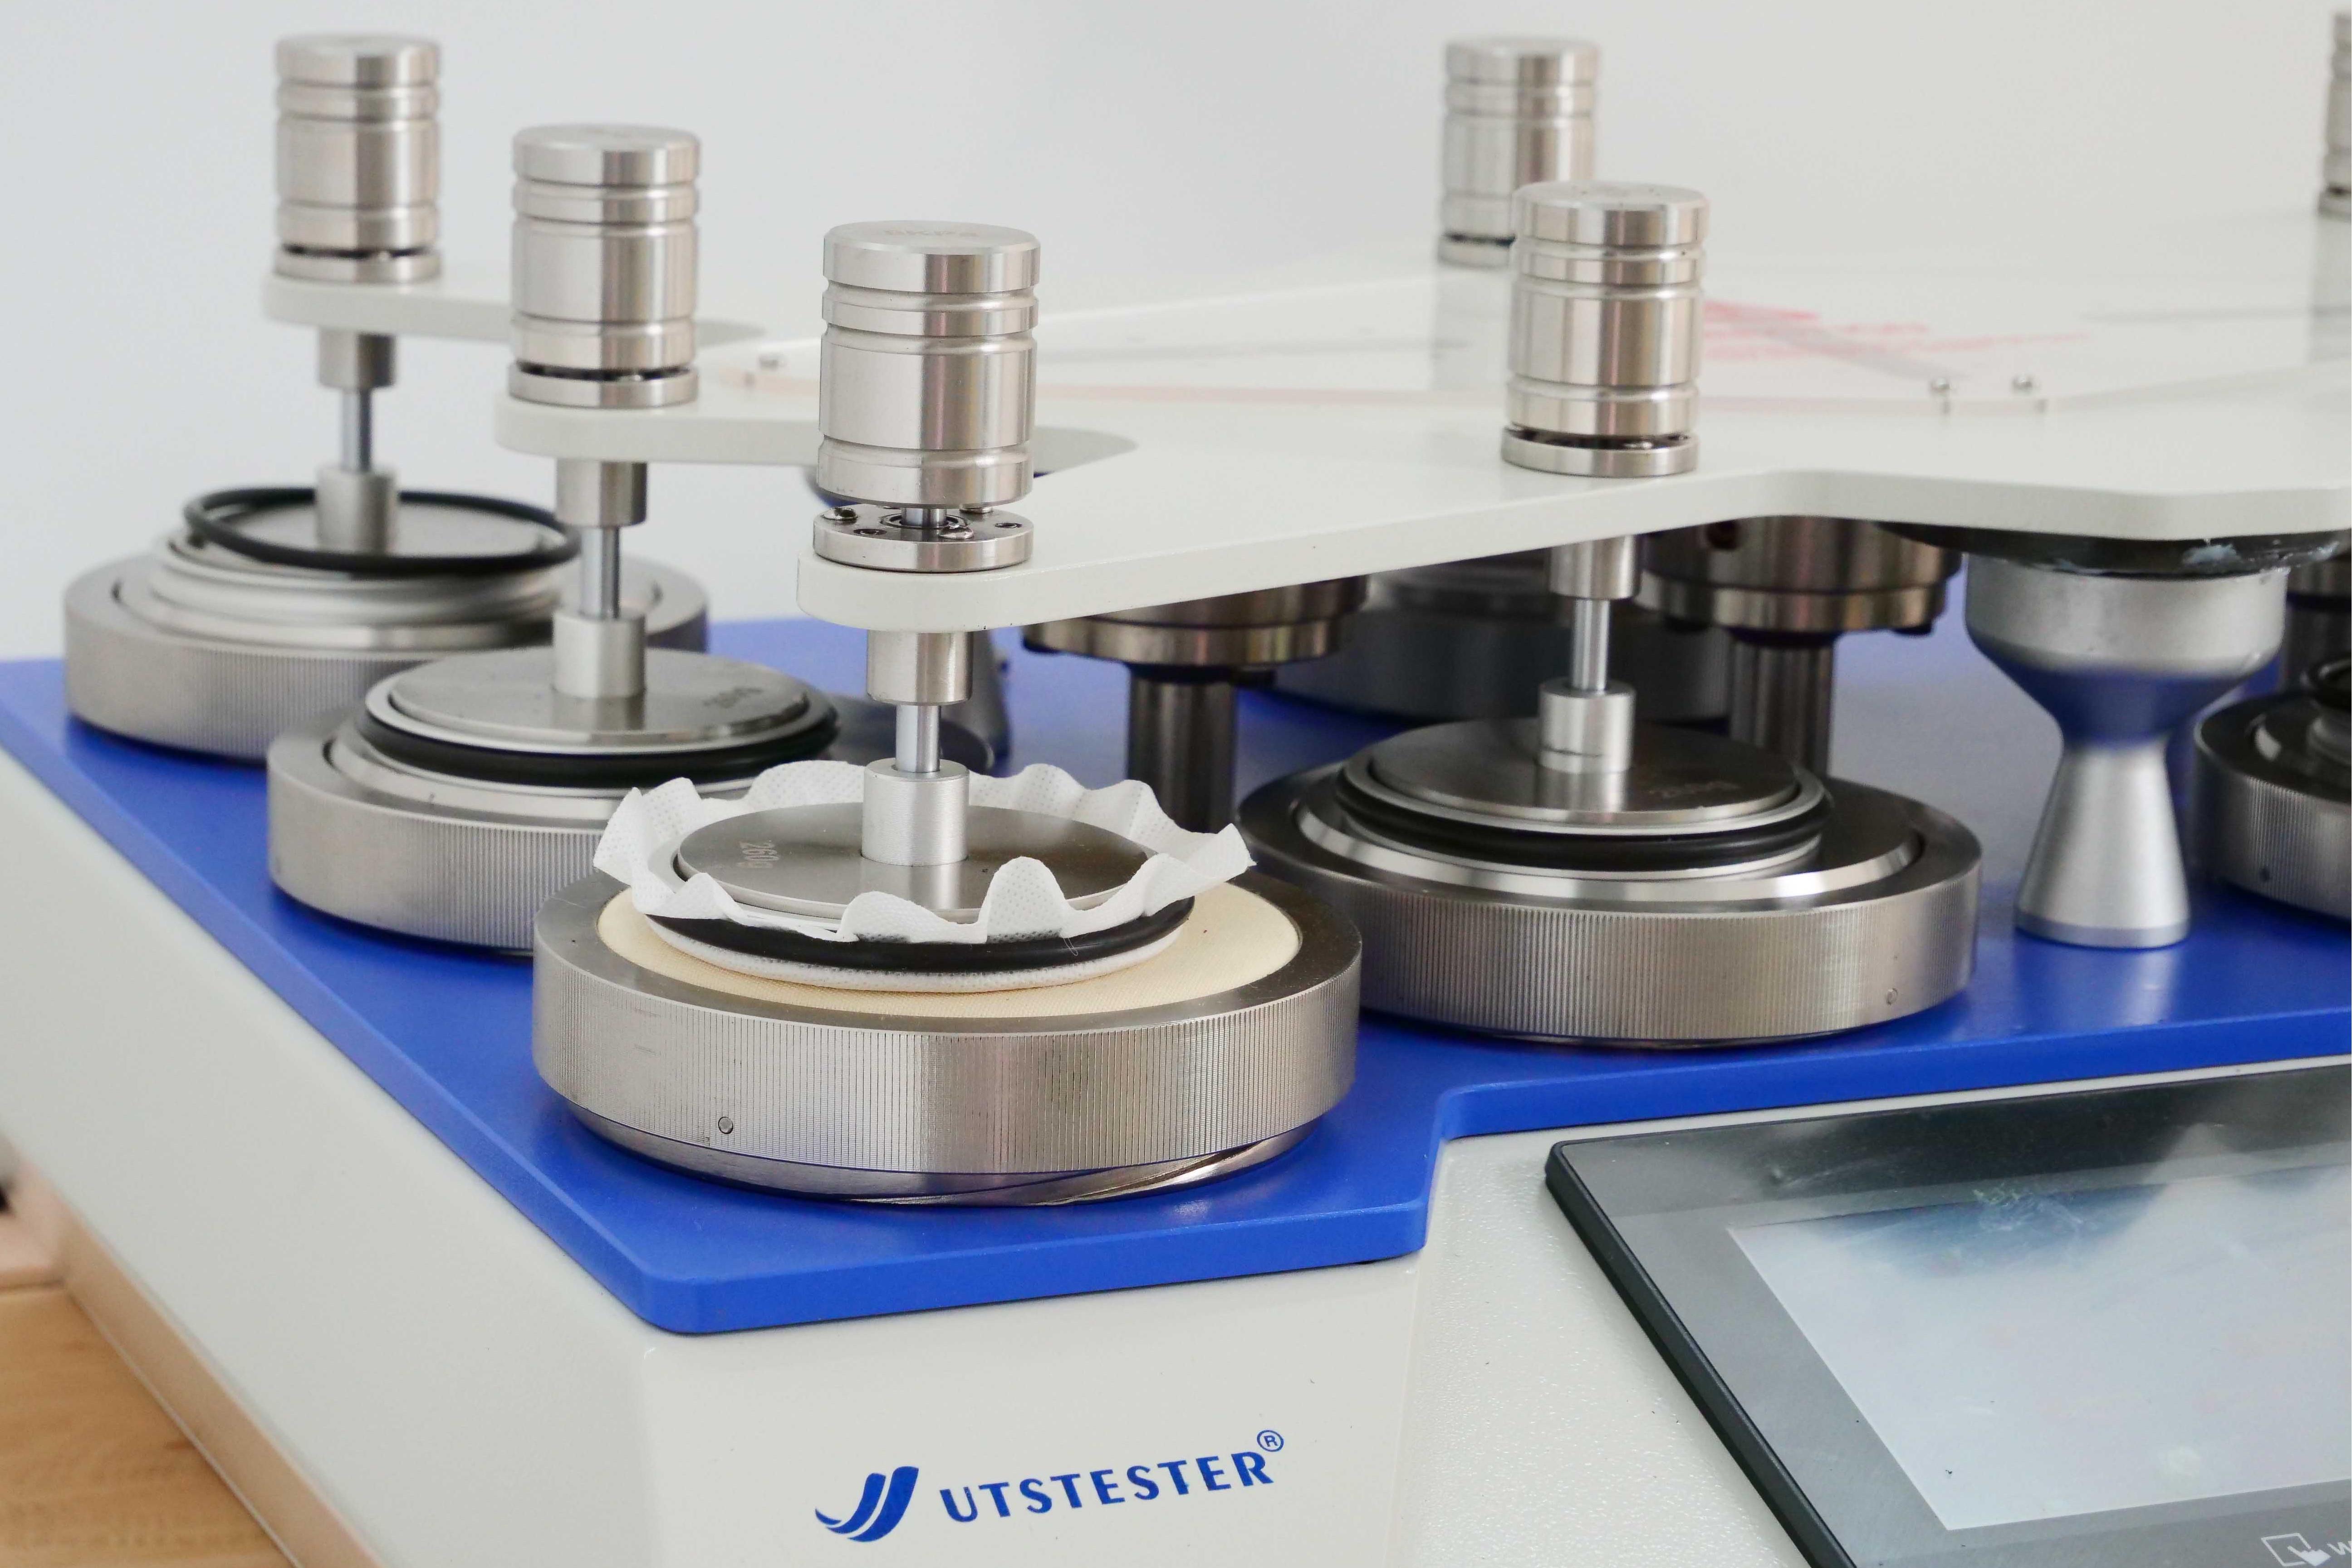
Martindale abrasion testing machine can test the abrasion resistance and pilling performance of various plants. Under a certain pressure, the specimen and the specified abrasive material are continuously rubbed in different directions, and the degree of abrasion and pilling is evaluated in comparison with the standard parameters. Touch screen control with full-featured programmer with pre-programmed batch and total counts, individually set counts for each test head; 4 speeds can be selected including the standard speed.


Conforms to the standard:

GB/T 21196.1-2007 Textiles: Determination of abrasion resistance of textiles by Martindale method Part 1

GB/T 21196.2-2007 Textiles: Determination of abrasion resistance of textiles by Martindale method Part 2

GB/T 21196.3-2007 Textiles: Determination of abrasion resistance of textiles by Martindale method Part 3

GB/T 21196.4-2007 Textiles: Determination of abrasion resistance of textiles by Martindale method Part 4

GB/T 4802.2-1997 Textiles Textile pilling test by Martindale method

GB 8690-88 Woolen fabrics abrasion resistance test method Martindale method

ISO 12945-2:2002 Textiles Determination of surface pilling properties of fabrics Part 2 Martindale method

GB/T 13775-92 Abrasion resistance test for cotton, linen and silk woven fabrics Martindale method

ASTM D4966-1988 Abrasion resistance test of fabric Martindale abrasion tester

ASTM D4970-2002 Test Method for Pilling and Snagging Resistance of Fabric Martindale Tester


Rating method:

Mainly refer to the expert subjective rating method to evaluate the hairiness and pilling index, choose Martindale pilling instrument, with reference to GB/T4 802.2-1997 for experiments, the bottom film composite nonwoven raw materials friction 120 (150 finished products), the surface and leakage-proof spacer nonwoven fabric friction 30, test 8 samples, comparison of friction samples and standard samples of the surface of the surface of the hairy surface condition and entanglement points, on the Each sample is judged by its linting level, which is mainly divided into 4 levels:

Level 1: Qualified (tangle point is 0) no linting

Level 2: qualified (tangle point ≤ 5) slight hairiness

Level 3: unqualified (tangle point ≤ 10) more serious pilling

Grade 4: Unqualified (tangle point>10) serious pilling

Pilling condition or tangled points between 3 and 4 are judged to be 3.5 grade.

The final level of the sample = (X1+X2+...+X8)/8, the final level of ≤ 2 for qualified products, if the 8 test samples appear 2 or more pieces of serious pilling is considered unqualified samples.


Email: hello@utstesters.com

Direct: + 86 152 6060 5085

Tel: +86-596-7686689

Web: www.utstesters.com

...

Why is breathability testing crucial for athletic apparel performance?

Breathability directly impacts wearer comfort, particularly in athletic wear and outdoor gear. Breathable fabrics effectively wick away sweat, keeping skin dry to enhance comfort and athletic performance. In athletic apparel design, breathability is a key metric—designers must ensure selected materials provide adequate airflow during intense activity.


I. Definition of Breathability

Breathability refers to the ability of gases to pass through polymers, including films, coatings, and fabrics. “Vapor permeability” specifically denotes the capacity of water vapor to traverse fabrics, also termed “moisture permeability” within the industry. Ensuring comfort requires meeting both air permeability and vapor permeability requirements.


Fabric breathability measures the ability of air to pass through the material. It is tested by creating a pressure differential across the fabric. Specifically, it is the pressure differential across the fabric. It represents the volume of air flowing through a unit area of the fabric per unit time. The common unit is mm/s. Air requires a pressure differential to flow. The fabric must maintain this pressure differential to generate airflow.


II. Testing Principle

When a pressure differential exists across the fabric, air flows through it. Flow rate is the volume of air passing through a unit area of the fabric per unit time. The common unit is mm/s. Because a pressure differential is essential for airflow.


Only a pressure differential enables air movement. Therefore, the fabric on both sides must maintain a certain pressure differential to allow air passage. Breathability impacts fabric comfort. It affects the fabric's thermal insulation and warmth retention. Fabric breathability is crucial for the body. It transfers heat, moisture, and gases like carbon dioxide to the outside.


III. Why Sportswear Requires Breathability

During exercise, the human metabolic rate increases dramatically, generating significant heat and sweat. Data indicates that during high-intensity exercise, the human body can sweat 0.5-2 liters per hour. At this point, the core mission of athletic apparel is to rapidly dissipate heat and expel sweat, maintaining the balance of the “microclimate” between the skin and the garment—the temperature, humidity, and airflow velocity of this microclimate directly determine wearing comfort.


Well-ventilated athletic apparel creates efficient airflow channels, allowing cool external air to enter while expelling warm internal air for effective heat exchange. Simultaneously, moisture-wicking properties rapidly transport sweat from the skin's surface to the outer fabric layer for evaporation, preventing the sticky discomfort caused by sweat buildup. Conversely, poorly breathable garments act like an “airtight barrier,” trapping heat and sweat between skin and fabric. This raises perceived body temperature by 2-3°C, causing intense discomfort and increasing the risk of skin friction injuries.

Breathability testing scientifically quantifies a fabric's air transmission capacity, ensuring clothing maintains its “thermoregulatory” function across varying exercise intensities.


IV. Performance Impact of Apparel Breathability

For professional athletes or enthusiasts pursuing athletic efficiency, breathability not only affects comfort but directly impacts performance. Sports medicine research indicates that insufficient breathability in clothing causes sustained increases in core body temperature, leading to accelerated heart rate and heightened physical exertion. This can reduce exercise endurance by over 18%.


Different athletic scenarios demand varying levels of breathability, and breathability testing enables companies to achieve “precise matching.” For instance: - Polyester fabrics commonly used in running apparel must ensure an air permeability rate ≥120mm/s to manage sustained heat generation; Nylon fabrics for mountaineering apparel must prioritize moisture evaporation rates ≥550g/m²/h to meet sweat management demands in variable outdoor conditions; while elastic garments like yoga wear require testing for breathability changes ≤10% after 20% stretch to ensure stable ventilation during movement.


Additionally, breathability and fabric dynamic adaptability must be validated through testing. Body movements and fabric stretching during exercise alter pore structures. Dynamic breathability testing simulates real-world motion to ensure garments maintain consistent breathability under conditions like stretching and friction, preventing performance degradation due to breathability failure during activity.


V. Apparel Fabric Breathability Testing Instruments

The precision of breathability testing directly relies on specialized testing instruments. High-quality textile testing equipment can simulate various environmental conditions (temperature, humidity, pressure differential) to accurately measure multiple indicators such as air permeability, moisture resistance, and thermal resistance, providing enterprises with comprehensive and reliable performance data.


Digital breathability testers deliver reliable results quickly. They are suitable for breathability testing of various textiles. This includes technical textiles, nonwovens, and other breathable products. It complies with standards such as GB/T5453, GB/T13764, ISO9237, ISO7231, ISO5636, ASTM D737, DIN 53887, JIS L1096, BS5636, and others.


Air flows vertically through the fabric. This creates a pressure difference between the front and back surfaces of the fabric. We measure the airflow rate through the fabric at a set pressure differential. This yields the air permeability value.


Conclusion: Prioritizing Air Permeability Testing to Create Truly “High-Performance Sportswear”

From wear comfort to athletic performance, from health safety to market competitiveness, air permeability is an indispensable core performance characteristic of sportswear. Air permeability testing serves as the “critical link” in ensuring this performance. It not only provides enterprises with precise performance data to support R&D upgrades and quality control but also enables consumers to purchase functional sportswear that genuinely meets their needs.


As a dedicated player in the textile testing instrument field, we remain committed to delivering breathability testing solutions compliant with international and domestic standards. This empowers enterprises to accurately control product breathability performance and enhance their core competitiveness.

Fabric Breathability Testing Instruments


Email: hello@utstesters.com

Direct: + 86 152 6060 5085

Tel: +86-596-7686689

Web: www.utstesters.com


...

How Does Carton Drop Testing Help Minimize Product Damage in Transit?

1. The Importance of Drop Testing


Drop testing simulates the impact conditions that products may encounter during transportation and storage to evaluate the protective performance of packaging. Good packaging must not only protect products from external environmental damage, but also provide cushioning when impacted to reduce the risk of product damage. Drop testing is crucial for evaluating the rationality and effectiveness of packaging design.


2. Drop Test Standards


2.1 Height Standards: The height for drop tests is typically determined based on the product's weight, dimensions, and fragility. Generally, drop heights are categorized into several levels, such as 30 cm, 50 cm, and 100 cm. The appropriate drop height should be selected based on actual conditions during testing.

2.2 Number of Drops Standards: The number of drops in a drop test is also an important indicator for evaluating packaging performance. Generally, the more drops, the better the packaging's protective performance. Common drop test frequencies include 1 time, 2 times, 3 times, etc., with the specific frequency determined based on product characteristics and test requirements.

2.3 Angle Standards: The angles used in drop tests typically include 90 degrees, 45 degrees, and 0 degrees. Drops at different angles can simulate various impact scenarios that products may encounter during transportation, thereby more effectively evaluating the protective performance of the packaging.


3. Drop Test Method


3.1 Preparation: Before conducting the drop test, ensure that the product is properly placed inside the packaging and sealed according to actual transportation conditions. Prepare the drop test equipment, such as a drop test machine or manual drop device.

3.2 Selecting Drop Height and Number of Drops: Based on product characteristics and test requirements, select an appropriate drop height and number of drops. Ensure that the product is not damaged during the test.

3.3 Conducting the Drop Test: Drop the product at the predetermined height and angle, observing the deformation of the packaging during the drop and whether the product is damaged. If necessary, use high-speed cameras or other equipment to record the drop process for subsequent analysis.

3.4 Analyzing Test Results: Evaluate the protective performance of the packaging based on observations and analysis during the drop test. If defects in the packaging or product damage are detected, promptly improve the packaging design or adjust the drop test parameters.


4. The Significance of Carton Drop Tests for Product Transportation


4.1 During transportation, products may be subjected to various operations (such as accidental drops during manual handling, falls during forklift transfers, stack collapses, or collisions during loading/unloading) that can cause them to fall. The angle of impact (face, edge, or corner), height, and impact force vary, resulting in significant differences in the extent of damage to the products. By simulating drop scenarios under different conditions, potential risk points that could lead to product damage during actual transportation (such as carton rupture when dropped on a specific face or internal product deformation due to pressure when dropped on a specific corner) can be identified in advance, thereby preventing issues from arising during actual circulation.

4.2 After drop testing, inspections of the carton and internal products can directly identify weaknesses in packaging design or materials.

4.3 Based on defects identified through testing, targeted packaging improvements can be made to fundamentally enhance protective performance.


The core value of carton drop testing lies in “proactively identifying risks, quantifying packaging performance, and guiding precise optimization.” By simulating real-world impacts, identifying defects, and improving designs, packaging can effectively protect products, reduce damage rates during transportation from the source, lower costs associated with returns and claims for businesses, and simultaneously enhance customer satisfaction.

Email: hello@utstesters.com

Direct: + 86 152 6060 5085

Tel: +86-596-7686689

Web: www.utstesters.com

...

How to clean the melt flow index instrument after use

The melt flow indexer is a precision instrument used to measure the fluidity of plastics in a molten state. It is widely used in the fields of materials science, plastics industry and quality control. In order to maintain its test accuracy and extend its service life, cleaning after use is essential. The following are detailed steps for cleaning the melt flow indexer after use:


Take out the sample: After the test, wait for the barrel to cool to a certain temperature, use the ejector rod to eject the remaining sample from the barrel, take out the sample and place it properly.

Clean the die: Use special die cleaning tools, such as die cleaning needles, scrapers, etc., to carefully remove the residual material in the die. Be careful to operate gently to avoid damaging the inner wall of the die. For some difficult-to-clean material residues, you can use appropriate solvents for soaking and cleaning, but be careful to choose solvents that are not corrosive to the instrument, and wipe it dry with a clean cloth after cleaning.


Clean the barrel: Generally, a copper brush or a stainless steel brush is used, which is inserted into the barrel and rotated to remove the material attached to the inner wall of the barrel. For stubborn material residues, use a cotton ball or gauze soaked in solvent to wipe, but make sure that the solvent does not damage the barrel. After cleaning, blow the barrel dry with clean air, or use clean gauze to wipe it dry.


Clean the piston rod: Wipe the piston rod with a clean cloth to remove the material and oil on the surface. If there is material adhering to the piston rod, use a solvent to clean it and then wipe it dry. Make sure the surface of the piston rod is clean and smooth to ensure its normal operation and measurement accuracy.


Clean the outside of the instrument: Wipe the outer casing of the instrument with a damp cloth to remove dust and stains on the surface. For stubborn stains, use a small amount of mild detergent, but avoid the detergent flowing into the inside of the instrument. After wiping, wipe the outer casing of the instrument with a dry cloth.


Turn off the power: After all cleaning work is completed, turn off the power switch of the instrument and unplug the power plug.


Inspection and maintenance: Regularly check whether the various parts of the instrument are intact. If wear or damage is found, replace them in time. Perform necessary lubrication and maintenance on the instrument to ensure that it is in good working condition.


When cleaning the melt flow index meter, be sure to follow the instrument's instruction manual to avoid damage to the instrument due to improper operation. At the same time, the instrument should be regularly maintained to extend its service life and ensure measurement accuracy.


melt flow index meter


Email: hello@utstesters.com

Direct: + 86 152 6060 5085

Tel: +86-596-7686689

Web: www.utstesters.com


...

How to test the mechanical and physical properties of toys according to EN 71-1

To ensure the safety of children's toys, the EN 71 series of standards was established. This series includes EN 71-1, Test methods for mechanical and physical properties.


1. Standard Description

EN 71-1 Safety of toys — Part 1: Mechanical and physical properties


2. EN 71-1 covers the following aspects:

2.1 Mechanical and physical properties: EN 71-1 specifies requirements for the mechanical and physical properties of toys to ensure they do not pose a hazard to children during play. This includes requirements related to material strength and integrity, as well as test methods for evaluating these properties.

2.2 Age Appropriateness: This standard provides guidance for age-appropriate labeling of toys. This is important to ensure that toys are appropriate for the intended age group, as younger children may have different safety needs than older children.

2.3 Small Parts: EN 71-1 includes requirements related to small parts in toys. Small parts can pose a choking hazard to young children, so this standard specifies size limits and test methods to determine whether a toy contains small parts.

2.4 Sharp Corners and Edges: This standard specifies requirements for sharp corners and edges in toys to prevent injuries.

2.5 Toys with cords, straps, or elastics: If a toy has cords, straps, or elastics, EN 71-1 includes requirements to minimize the risk of strangulation or entanglement.

2.6 Hygiene: This standard addresses hygiene requirements for toys to ensure they do not pose a risk to children's health.


3. Objectives

Toys are tested according to the EN 71-1 standard. The requirements of this standard vary depending on the age of children the toy is intended for and the type of toy.

These requirements primarily address the physical characteristics of toys, such as sharp edges, points, and small parts that could entrap. Requirements also include crushing injury risks, tumble hazards, and loads. Other requirements include information included with the purchase of the product, such as assembly instructions, warnings, and the CE label.

In addition, analysis and testing are performed according to EN 71-2 (Flammability) and EN 71-3 (Migration of Chemical Substances).

4. Other Related Standards

EN 71-2 Safety of Toys — Part 2: Flammability

EN 71-3 Safety of Toys — Part 3: Migration of Certain Elements


Email: hello@utstesters.com

Direct: + 86 152 6060 5085

Tel: +86-596-7686689

Web: www.utstesters.com


...

Luggage Trolley Inspection Items and Methods

11 Luggage Trolley Inspection Items


1. Appearance Defect Inspection: Inspect the tie rod surface visually or with a magnifying glass to identify defects such as scratches, dents, coating peeling, and oxidation.

2. Dimensional Accuracy Inspection: Use a vernier caliper or micrometer to measure tie rod diameter, wall thickness, section length, and other dimensions to ensure compliance with design specifications.

3. Material Composition Inspection: Use a spectrometer to determine the chemical composition of the tie rod metal or composite material to verify that it is the specified material.

4. Tensile Strength Testing: A tensile testing machine applies tension to the tie rod to test the maximum load at which it breaks, thereby assessing structural strength.

5. Compressive Strength Testing: A press machine applies vertical pressure to the tie rod to observe its deformation and damage under compression.

6. Fatigue Life Testing: A fatigue testing machine simulates the repeated extension and retraction of the tie rod, recording the number of cycles before failure or damage occurs.

7. Shake Test: After the tie rod is secured, a swing device is used to measure its lateral and longitudinal shake to determine operational stability.

8. Corrosion Resistance Test: Place the tie rod in a salt spray test chamber to simulate a humid environment. Observe surface rust and assess rust resistance.

9. Coating Adhesion Test: Use a cross-cut test or tape stripping method to check the durability of the tie rod surface coating.

10. Hardness Test: Use a Rockwell or Shore hardness tester to measure the surface hardness of the tie rod to determine its wear resistance and deformation resistance.

11. Locking Function Test: Manually operate the tie rod's telescopic locking mechanism to check the smoothness and reliability of its locking and unlocking.


9 Relevant Inspection Methods for Luggage Trolleys


1. Visual Inspection: Directly inspect the surface of the tie rod to check for defects such as scratches, deformation, and coating peeling.

2. Caliper Measurement: Use tools such as vernier calipers and micrometers to accurately measure dimensional parameters such as the tie rod diameter, wall thickness, and section length.

3. Spectroscopic Analysis: Use a spectrometer to analyze the chemical composition of the tie rod material to confirm whether it is made of the specified material, such as aluminum alloy or stainless steel.

4. Tensile Test Method: A tensile force is applied to the tie rod using a tensile testing machine to determine its tensile strength and fracture limit.

5. Compression Test Method: A press is used to apply vertical pressure to the tie rod to test its resistance to deformation under pressure.

6. Fatigue Test Method: A fatigue testing machine is used to simulate frequent extension and retraction of the tie rod to test its fatigue life.

7. Salt Spray Test: The tie rod is placed in a salt spray chamber to simulate a humid and corrosive environment to evaluate its surface rust and corrosion resistance.

8. Hardness Test: A Rockwell or Shore hardness tester is used to measure the surface hardness of the tie rod to determine its wear resistance.

9. Shake Test: The tie rod is secured with a swing device and its lateral and longitudinal shake is measured to determine stability.


Email: hello@utstesters.com

Direct: + 86 152 6060 5085

Tel: +86-596-7686689

Web: www.utstesters.com


...

Shoe Lining/Sock Cover Waterproof Testing

Product Name: Shoe Lining Water Permeability Tester/Shoe Lining Waterproof Tester


Sock cover waterproof testing is a critical step in evaluating the water resistance of sock covers (such as splash resistance, water seepage resistance, and water pressure resistance). It is widely used in quality inspection for sock cover products in outdoor, medical, and industrial protective scenarios.


1. Product Description:

The shoe lining water resistance tester rapidly detects whether rubber-soled shoes and inner linings are waterproof. This machine can be integrated into production lines for 100% inspection of finished products, ensuring comprehensive control over waterproof quality. During testing, the machine's pneumatic fixture seals the test specimen and submerges it in water while simultaneously injecting pressurized air. Any water ingress immediately produces bubbles. Upon reaching the preset test duration, the fixture automatically floats the specimen to the surface.


2. Test Methods:

Inflation Method: Seal the shoe opening. Fill the sealed shoe cavity with compressed air at a specified pressure, then submerge the shoe in a water tank. Maintain the water level within 75mm of the shoe opening. After a specified duration, inspect the shoe surface for bubbles.

Immersion Method: Submerge the shoe in water, maintaining the water level within 75mm of the shoe opening. After a specified immersion period, remove the shoe and inspect for water ingress.

Compliant Standards: GB/T 20991 Section 5.7, ISO 20344 Section 5.7, AS/NZS 2210.2 Section 5.7, ISO 8782-1, HG/T3664


3. Specifications for Shoe Lining Water Resistance Tester:

Clamp Face Length: 220mm

Simultaneous Testing Capacity: 2 pieces (4 pieces can also be accommodated)

Fixture lifting stroke: 320mm

Inflation pressure: 0~50kPa or (air compressor provided by customer)

Water tank dimensions: 42×42×32cm

Timer: LED, 0~99999999 seconds

Dimensions: 93×50×150cm

Weight: 130kg

Power supply: 1∮, AC220V, 3A


4. Sample preparation:

(1) Samples shall be drawn from batches of finished shoes (boots).

(2) Sample quantity: At least three pairs per group.

(3) Standardized sample conditions: Samples shall be conditioned for at least 24 hours prior to testing at 23°C and 60% relative humidity.

Machine Structure: Consists of motor, clamping device, control panel, pneumatic system, water tank, and main housing assembly


5. Result Evaluation:

(1) When testing by inflation method: Observe whether bubbles emerge from the shoe upper

(2) When testing by immersion method: Observe whether water penetrates into the shoe

shoe lining water resistance tester


Email: hello@utstesters.com

Direct: + 86 152 6060 5085

Tel: +86-596-7686689

Web: www.utstesters.com


...

What is Delta E in a colorimeter? And what do Lab color values represent?

1.What is Delta E?


Delta E is a calculation method used to measure the difference between the displayed color and the input color. A lower Delta E value indicates higher accuracy, while a higher Delta E value indicates a significant mismatch.

It is a standard metric established by the Commission Internationale de l'Éclairage (CIE).

The letter "E" in Delta E stands for "Empfindung", which means "sensation" in German. Delta is a Greek term that represents the incremental change of a variable. Overall, the term Delta E refers to the difference in sensation.

Delta E has a measurement range of 0 to 100, where 0 means minimal color difference and 100 means complete color distortion. The standard range of perceptual differentiation is as follows:

≤ 1.0: Imperceptible to the human eye

1–2: Perceptible upon close observation

2–10: Obvious at a glance

11–49: Color similarity exceeds contrast

100: Completely opposite colors


2. What Do Lab* Color Values Represent?


Colors measured in the CIE Lab color space are defined by three coordinates – L*, a*, and b* – with each coordinate corresponding to the following attributes:

L* – Lightness

a* – Degree of redness or greenness

b* – Degree of yellowness or blueness


Thus, Delta E (total color difference) is calculated based on delta L*, delta a*, and delta b* color values. All these values together provide a complete numerical description of a color within a rectangular coordinate system. Their specific meanings are as follows:


delta L*: Lightness difference between the sample and the standard color

delta a*: Redness or greenness difference between the sample and the standard color

delta b*: Yellowness or blueness difference between the sample and the standard color


3. How to Calculate Delta E?


In the context described in Section 2 above, the higher the value, the greater the difference in that specific dimension. Since Delta E is derived from three core components, its calculation is easier than you might think.

You simply need to calculate the square of the difference between the corresponding L*, a* and b* values, sum these squared differences together, and finally take the square root of this total sum.


This formula clearly quantifies the difference between two colors.

Then how can we determine whether the data measured by the instrument deviates from the target color in terms of lightness or darkness, redness or yellowness?

For a more intuitive understanding, you can refer to the diagram below.


Email: hello@utstesters.com

Direct: + 86 152 6060 5085

Tel: +86-596-7686689

Web: www.utstesters.com


...

What is the difference between single column and double column of universal tensile testing machine?

The tensile testing machine is designed for footwear, rubber, plastic, leather, metal, nylon thread, fabric, paper, aviation, packaging, construction, petrochemical and other tensile, compression, bending, shear, adhesive strength, peeling, tearing and other tests and design, electricians, vehicles and other materials.

According to the structure can be divided into single-column and double-column type, both in the design, performance and application scenarios there are obvious differences.


Differences in structural design

1. Single-column tensile testing machine: a single column (or frame) is used as the main support, the loading system and transducer are usually integrated above the column, and the specimen is mounted between the upper and lower fixtures, with a compact overall structure and small footprint.

Similar to the ‘T’ type or ‘L’ type, the upper part of the loading device, the lower part of the base (fixed lower fixture).

2. Double-column Tensile Testing Machine: Supported by two parallel columns (or frames), the loading system is located at the top, the testing space is formed between the two columns, and the lower fixture is fixed on the base, with a symmetrical and stable structure.

Similar to the ‘door’ type (door structure), two columns perpendicular to the base, the test space is located in the middle, the overall volume is larger.


Load capacity and applicable materials

1.Single-column type: the maximum test force is usually ≤10kN (a few can reach 20kN), suitable for small load test (such as film, fibre, rubber, plastic and other flexible materials), or small parts (such as springs, electronic components) of the tensile and compression test.

2.Double-column type: the maximum test force can cover 10kN-500kN (or even higher), can withstand large loads (such as steel, concrete, automotive parts, etc.), suitable for high-strength materials mechanical properties testing, such as tensile strength, yield strength.

Application: Widely used in aerospace, machinery manufacturing, construction building materials and other industries for quality testing.


Operation and Expandability

Single-column type: small size, light weight, easy to move, suitable for laboratory desktop use; but with limited functional expandability (e.g., difficult to install complex accessories, such as high-temperature furnace, environmental chamber, etc.).

Double-column type: usually equipped with a larger working surface and expansion interface, can be added with an extensometer, high/low temperature environmental devices, dynamic loading system, etc., to support multi-functional testing (such as fatigue test, creep test, etc.).


Summary

The core difference between single-column and double-column tensile testers lies in the load capacity, precision and structural design, the former is suitable for small load and low precision scenarios, while the latter is suitable for large load, high precision and complex testing needs. The selection should be based on the material characteristics, testing standards, budget and functional requirements of a comprehensive judgement to ensure that the equipment performance and application scenarios match.


Email: hello@utstesters.com

Direct: + 86 152 6060 5085

Tel: +86-596-7686689

Web: www.utstesters.com


...

Why Box Compression Testers Are Essential in the Packaging Industry

From rough handling during e-commerce parcel sorting to multi-layer stacking in warehouses, packaging boxes constantly endure external forces. As the core equipment for quantifying packaging protection capabilities, box compression testers help measure the pressure a box can withstand before collapse, ensuring product safety during transportation and storage.


1. What is a Box Compression Tester?


A box compression tester (also known as a carton compression tester) is a specialized device that uses standardized loading methods to evaluate the crush strength, stacking endurance, and deformation characteristics of packaging containers (such as corrugated boxes, honeycomb panels, etc.). It applies controlled force to a box until it deforms or collapses, clearly indicating its load-bearing capacity. It precisely measures three core metrics: maximum crush strength (the highest load before box failure), stacking strength (long-term deformation resistance under constant load), and deformation rate (shape change under specific pressure), providing quantifiable data for packaging quality.


2. Why is a Box Compression Tester Needed?


The packaging industry is rapidly evolving. Online shopping, global trade, and sustainability demands are driving companies to create stronger, lighter, and more eco-friendly boxes. But how do you know if your packaging is up to the task? This is where the box compression tester becomes a game-changer:

Protect Products: Boxes are stacked in warehouses, loaded onto trucks, and jostled during transit. Weak boxes may collapse, damaging contents inside. Testing ensures your packaging withstands pressure.

Save money: Damaged products mean refunds, replacements, and lost trust. By identifying weaknesses early, you avoid these headaches and cut costs.

Meet standards: Many industries have strict packaging strength regulations. Box crush testers help prove your boxes meet these requirements, avoiding legal or compliance issues.

Enhance Reputation: Customers expect their orders to arrive intact. Sturdy packaging builds trust and fosters repeat business.

Sustainability: Eco-friendly packaging is a major trend. Lighter materials reduce waste, yet must remain robust. Testing helps strike the perfect balance.

As supply chains grow increasingly complex and customer expectations rise, investing in this tool is a wise move for any business serious about packaging.


3. Working Principle of the Box Compression Tester


The device operates based on mechanical loading and sensor detection principles. Its core structure comprises a fixed lower platen, a movable upper platen, a force sensor, and a control system. Testing follows a three-step core logic:

Load Simulation: Position the sample centrally on the plates. Apply an initial load to ensure tight contact. Subsequently, drive the upper plate via motor-operated screw (or hydraulic transmission) to apply uniform pressure at a standardized rate, precisely replicating warehouse stacking and transportation compression scenarios.

Data Acquisition: The LOAD CELL force sensor captures pressure changes in real time, simultaneously recording the pressure-deformation curve.

Result Output: Automatic shutdown occurs upon reaching preset load or container failure. The system generates data including peak force and deformation rate. Some intelligent devices can directly print test reports in both Chinese and English.


4. Core Applications of the Container Compression Tester


Though termed a carton compression tester, this tool extends beyond corrugated boxes. Its applications span diverse industries and materials.

Corrugated Boxes: Most commonly used to test how much weight shipping boxes can withstand before collapsing.

Cartons and Drums: From small single boxes to large drums, the tester checks their stacking strength.

E-commerce Packaging: Online retailers use it to ensure their boxes survive long-distance shipping.

Food Industry: Think of crates for fruit or beverage cartons—testing ensures perishable goods arrive safely.

Warehousing: It helps determine how high boxes can be stacked without collapsing, maximizing storage space.


5. Box Crush Tester FAQ


1. What is a box crush tester used for?

The Box Crush Tester (BCT) measures the crush strength of corrugated boxes, cartons, and packaging materials. It helps manufacturers ensure their packaging can withstand stacking and transport pressures, preventing product damage during shipping and storage.


2. What is the formula for box compression testing?

Box Crush Test (BCT) is calculated using the following formula:

BCT = Load (F) × Area (A) × BCT

Where:

BCT = Box Crush Test (in kN or N)

F = Applied Load (in Newtons)

A = Box Surface Area (in square meters)


3. What are the units for BCT?

Box Compression Test (BCT) is typically measured in Newtons (N), kilonewtons (kN), or kilogram-force (kgf), depending on the standard and region.

box compression testers


Email: hello@utstesters.com

Direct: + 86 152 6060 5085

Tel: +86-596-7686689

Web: www.utstesters.com


...